Python & Pycharm installation
In this article, we are going to see how to install python in windows/MAC os and also how to install pycharm. Once we have this setup. In subsequent articles, we will dive into python.
Python installation:
For Windows:
- Click Python Download. The following page will appear in your browser.

- Click the Download Python 3.6.2 button. The file named python-3.6.2.exe should start downloading into your standard download folder. This file is about 30 Mb so it might take a while to download fully if you are on a slow internet connection (it took me about 10 seconds over a cable modem).
The file should appear as - Move this file to a more permanent location, so that you can install Python (and reinstall it easily later, if necessary).
- Feel free to explore this webpage further; if you want to just continue the installation, you can terminate the tab browsing this webpage.
- Start the Installing instructions directly below.
- Click Python Download. The following page will appear in your browser.
Installing
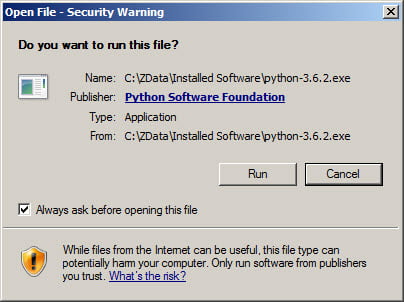
- Double-click the icon labelling the file python-3.6.2.exe.An Open File – Security Warning pop-up window will appear.

- Click Run. A Python 3.6.2 (32-bit) Setup pop-up window will appear.

- Ensure that the Install launcher for all users (recommended) and the Add Python 3.6 to PATH checkboxes at the bottom are checked.If the Python Installer finds an earlier version of Python installed on your computer, the Install Now message will instead appear as Upgrade Now (and the checkboxes will not appear).
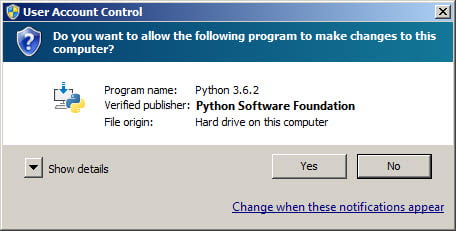
- Highlight the Install Now (or Upgrade Now) message, and then click it. A User Account Conrol pop-up window will appear, posing the question Do you want the allow the following program to make changes to this computer

- Click the Yes button. A new Python 3.6.2 (32-bit) Setup pop-up window will appear with a Setup Progress message and a progress bar.

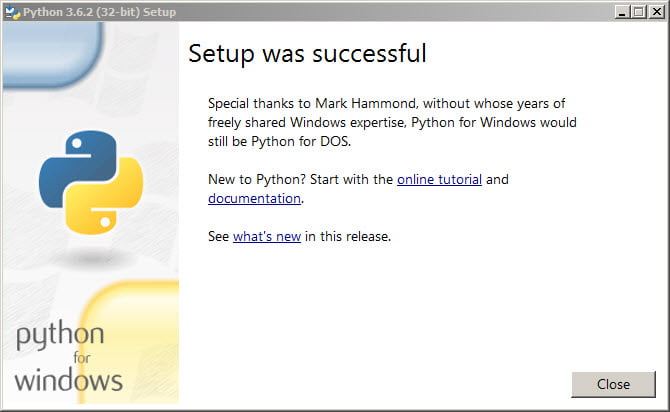
- During installation, it will show the various components it is installing and move the progress bar towards completion. Soon, a new Python 3.6.2 (32-bit) Setup pop-up window will appear with a Setup was successfuly message.

- Click the Close button.
- Double-click the icon labelling the file python-3.6.2.exe.An Open File – Security Warning pop-up window will appear.
Python should now be installed.
Verifying
To try to verify installation,
- Navigate to the directory where Python was installed: see the pop-up window for Installing step 3).
- Double-click the icon/file python.exe.The following pop-up window will appear.

- Inside the window, at the bottom left, is the prompt >>>: type exit() to this prompt and press enter to terminate
For IOS:
IOS comes with pre-installed python2.7
For Linux:
Linux also comes with pre-installed python2.7
If you are using Ubuntu 16.10 or newer, then you can easily install Python 3.6 with the following commands:
1 2 3 | $ sudo apt-get update$ sudo apt-get install python3.6 |
If you’re using another version of Ubuntu (e.g. the latest LTS release), we recommend using the deadsnakes PPA to install Python 3.6:
1 2 3 4 5 6 7 | $ sudo apt-get install software-properties-common$ sudo add-apt-repository ppa:deadsnakes/ppa$ sudo apt-get update$ sudo apt-get install python3.6 |
If you are using other Linux distribution, chances are you already have Python 3 pre-installed as well. If not, use your distribution’s package manager. For example on Fedora, you would use dnf:
1 | $ sudo dnf install python3 |
Note that if the version of the python3 package is not recent enough for you, there may be ways of installing more recent versions as well, depending on you distribution. For example installing the python36 package on Fedora 25 to get Python 3.6. If you are a Fedora user, you might want to read about multiple Python versions available in Fedora.
pycharm Intallation:
IOS:
- Download the pycharm-2018.1.dmg macOS Disk Image file from https://www.jetbrains.com/pycharm/download/#section=mac
- Mount it as another disk in your system
- Copy PyCharm to your Applications folder
Windows:
- Download community edition for windows from https://www.jetbrains.com/pycharm/download/#section=windows
- Run the pycharm-2018.1.exe file that starts the Installation Wizard
- Follow all steps suggested by the wizard. Please pay special attention to the corresponding installation options
Linux:
- Install pycharm community edition from https://www.jetbrains.com/pycharm/download/#section=linux
- Copy the pycharm-2018.1.tar.gz to the desired installation location
(make sure you have rw permissions for that directory) - Unpack the pycharm-2018.1.tar.gz using the following command:
tar -xzf pycharm-2018.1.tar.gz - Remove the pycharm-2018.1.tar.gz to save disk space (optional)
- Run pycharm.sh from the bin subdirectory
That's all for this topic. If you guys have any suggestions or queries, feel free to drop a comment. We would be happy to add that in our post. You can also contribute your articles by creating contributor account here.
Happy Learning 🙂
If you like the content on CodePumpkin and if you wish to do something for the community and the planet Earth, you can donate to our campaign for planting more trees at CodePumpkin Cauvery Calling Campaign.
We may not get time to plant a tree, but we can definitely donate ₹42 per Tree.
About the Author
Tags: python, Python Tutorials
Comments and Queries
If you want someone to read your code, please put the code inside <pre><code> and </code></pre> tags. For example:<pre><code class="java"> String foo = "bar"; </code></pre>For more information on supported HTML tags in disqus comment, click here.


